
⚡Quick Answer
The best way to spring clean your living room is to work in this order: in-depth dusting and light fixtures, TV and electronics, upholstery and furniture, then baseboards and floors last. Always clean top to bottom so dust only falls onto surfaces you haven’t cleaned yet. Budget 2 to 3 hours for a thorough reset.
Let me show you the best way to spring clean your living room. Welcome back to Week 4 of the Spring Cleaning Spree.
So far we’ve tackled the kitchen, the bathroom, and the bedroom, and today we are resetting one of the most used rooms in the house: your living room. This is where movie nights happen, where the dog has claimed the good cushion as his own, and where every visitor lands the moment they walk through the door. All that living leaves behind dust, crumbs, fingerprints on the TV, and a steady film on every surface. Here is how to do a complete reset on your living room.
🌱 Free Spring Cleaning Checklist
Download the checklist that keeps thousands of Clean Freaks on track every spring. Completely free.
Why This Step Matters
Dust is the number one thing that makes a living room feel dirty even when everything else looks fine. It builds up faster than most people realize, especially if you have pets or high traffic in your home. I’ve walked into houses that looked spotless from five feet away and found quarter-inch fuzz on top of a ceiling fan blade. It happens to everyone.
Dust also affects air quality and can trigger allergies for anyone in the house with asthma or sensitivities. Cleaning it out properly during spring cleaning makes a real, measurable difference in how the room feels for weeks afterward.
How to Do It
Always start dusting from the top and work your way down. This is one of the most important rules in cleaning. Dust falls. If you clean the coffee table first and then dust the ceiling fan above it, everything you just knocked loose lands right back on the coffee table. Top to bottom, every time.
When it comes to tools, I like to keep a few options nearby. A microfiber duster on an extension pole for high areas like fans and corners. A handheld duster for quick touch-ups on shelves and decor. A damp duster for grabbing and holding dust instead of spreading it. And microfiber towels for more detailed cleaning.
For higher gloss surfaces like glass tabletops or dark wood furniture, I use a damp microfiber towel followed by a dry one to buff and prevent streaks. The two-towel system is a theme you’ll see throughout this guide because it works on almost every surface.
💡Pro Tip from Brandon
Keep your tools clean while you work. If your duster gets loaded up with dust, you’re not removing anything anymore, you’re just pushing it around. Rinse or swap out dusters and microfiber towels as you go. I usually burn through at least two or three microfibers during a full living room dust-out.
Don’t forget the less-obvious spots: the tops of picture frames, window sills, the tops of door frames, decor on high shelves, light fixture covers, and ceiling fan blades. The classic pillowcase trick on ceiling fans is my favorite: slide an old pillowcase over each blade and pull it back. It contains the dust instead of knocking it all onto the floor.
⚠️If Your Room Dusts Up Fast
If you’re dusting and it seems like a new layer shows up within days, check your furnace or AC filter. A clogged filter stops doing its job and pushes dust right back into the room. Swap it every 2 to 3 months. An air purifier in the living room also makes a huge difference, especially with pets.
Read the Blog -> The Best Way to Dust a Room
Why This Step Matters
Your TV and electronics collect dust, fingerprints, and smudges faster than almost anything else in the living room, and they are one of the first things people notice when they walk in. A clean TV makes the whole room feel instantly nicer, and it takes about five minutes if you do it right.
More importantly, using the wrong technique here can permanently damage your screen. Scratches and chemical haze don’t come back out. This is a step where knowing the right method really matters.
How to Do It
Start by unplugging your TV. Don’t skip this. It’s safer, and a dark screen makes every streak and smudge impossible to miss. Use a dry microfiber towel or duster to remove the top layer of dust. This step is important because it makes the rest of the cleaning process much easier, and often it’s all you need.
⚠️Never Use Paper Towels on a TV
Paper towels, tissues, and any paper-based products can scratch your screen’s anti-glare coating over time and leave residue behind. Same goes for Windex, ammonia, and any glass cleaners with harsh chemicals. Keep them all off your TV. Microfiber only.
For deeper cleaning, use a simple two-towel system. One slightly damp microfiber to clean, one dry microfiber to buff. Make sure your damp towel is just barely damp, not wet. You never want water dripping anywhere near the TV. Work gently across the screen with light pressure. Never scrub.
If you run into tougher spots like grease or heavy smudges (looking at you, kids who touch the screen), mix a small amount of distilled water with a few drops of dish soap. Always spray your towel, never the screen directly. Then follow up with a damp towel to rinse and finish with a dry microfiber to remove any streaks.
While you’re here, wipe down the remote. Remotes are one of the grimiest things in the entire house because they get touched constantly and basically never get cleaned. A slightly damp microfiber does the trick. Don’t forget the soundbar, streaming boxes, and gaming consoles either. They all collect the same dust.
💡Pro Tip from Brandon
Removing dust first is what prevents scratching during the wet clean. If you skip the dry pass and go straight to a damp microfiber, you’re essentially dragging abrasive dust particles across the screen. Two minutes of dry dusting saves you from long-term haze.
Why This Step Matters
Your couch and chairs collect crumbs, dust, oils from skin and hair, and everyday buildup, especially in the cracks and crevices where cushions meet. If you have kids or pets, you know what I’m talking about. The stuff that lives under the cushions could qualify as a science experiment.
Fabric furniture also absorbs odors over time, and most people don’t notice until a guest sits down and says something. A proper extraction during spring cleaning resets the smell, the feel, and the look of the couch all at once.
How to Do It
Start by vacuuming your furniture thoroughly. Pull the cushions off if you can. Focus on seams, cushion gaps, and tight spaces where debris tends to collect. This step alone can make a huge difference, and it’s often the only thing a couch actually needs.
Use the upholstery attachment on your vacuum if you have one. A handheld vacuum or a vacuum with a hose works great for getting into corners and along the sides of the cushions.
For a deeper clean, this is where a spot cleaner or portable extractor really helps. These are my favorite tools for fabric furniture because they actually pull dirt out instead of pushing it deeper. Work in sections and use light moisture while cleaning. The goal is to flush dirt out and extract it at the same time, not soak the fabric.
⚠️Don’t Over-Wet the Fabric
If you use too much cleaner or water, you’ll end up with sticky spots that actually attract more dirt than before. Worse, a couch that stays wet for too long can develop a musty smell that is nearly impossible to get rid of. Use minimal moisture and always do extra dry passes.
After cleaning, focus on drying. Open windows, turn on a fan, or increase airflow however you can. A wet couch in a closed room is how you get that musty smell I just mentioned. I always try to extract upholstery in the morning so it has the whole day to dry.
Don’t forget the non-fabric surfaces. Wipe down the coffee table, end tables, and any wood or glass furniture using the two-towel method. For wood, stick to a cleaner meant for wood. For glass and dark surfaces, a damp towel followed by a dry one gives you a streak-free finish.
Read the Blog -> How to Clean a Couch
Why This Step Matters
Floors go last because everything you cleaned above this point settles here. Dust from shelves, debris from the couch, anything that fell off the ceiling fan. Cleaning the floor last means you capture all of it in one pass.
Baseboards are one of those details that most people skip between spring cleanings, but a clean baseboard instantly makes a room look cared for. The difference between a room with dusty, scuffed baseboards and one with clean ones is dramatic, even if no one can pinpoint exactly why.
How to Do It
Start with the baseboards and trim. Use a microfiber towel with a little water and mild cleaner. For scuff marks, a melamine sponge works great, but use it gently because it’s essentially very fine sandpaper and will remove paint if you go too hard. If you’d rather not kneel, wrap a microfiber around a broom or use a flat mop to hit the baseboards standing up. Once the baseboards are done, vacuum or dry-clean the entire floor. This step is critical. If you skip it and go straight to wet cleaning, all that dust and debris turns into a sticky mess and makes your job ten times harder. Dry first. Always.
Once the dry debris is gone, move on to wet cleaning. I recommend using a neutral pH floor cleaner because it won’t leave behind residue that attracts more dirt. A lot of all-purpose cleaners are too harsh for floors and actually make them dirtier over time. Work in sections so you don’t miss anything and can stay consistent. If you have wood floors or floors with a grain like luxury vinyl plank, always clean with the grain to prevent streaks.
💡Pro Tip from Brandon
Keep your mop head clean as you work. It fills up with dirt fast. If you don’t rinse it regularly, you’re just spreading that dirt back onto your floor. Rinse it often and change your water when it turns gray. I usually change my bucket water at least once per room during a real spring clean.
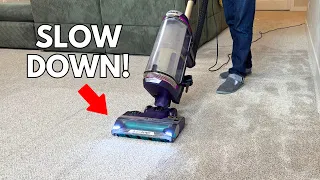
For carpet, follow up your vacuuming with a spot treatment on any visible stains, then consider a full carpet extraction if it’s been a while. A good vacuum and an extractor are the two tools that make the biggest difference in living room floor care.
Read the Blog -> How to Clean Hardwood Floors the Right Way
Read the Blog -> How to Vacuum Properly: The Technique Most People Get Wrong
