

If you’ve ever looked down at your tile and grout and thought, “Were these floors always this… color?” Congratulations! you’ve entered the unofficial adult rite of passage known as Grout Awareness. It’s the moment you realize your grout isn’t dark gray… it’s just dirty. Really dirty.
But don’t worry, you’re about to take back the game!
Over the years I have faced countless bathroom mold battles, and more kitchen grease disasters than an Airbnb host after a bachelor party weekend. I’ve also used every tool, every trick, every “miracle product,” and every questionable cleaning hack that should honestly come with a warning label.
Today, I’m giving you the real, battle-tested, results-forward method to clean tile and grout, the right way. The way that actually works. The way that won’t destroy your floors, ruin your nose hairs, or make you lose faith in humanity.
This is your complete guide to getting tile and grout so clean you’ll wonder why you waited this long.
What You’ll Need
The Stuff No One Tells You
Why Tile & Grout Get So Gross
Before we jump into the cleaning method, you need to understand why grout becomes the villain of your home. Tile surfaces are pretty easy-going, wipe them down and they’re happy. But grout? No. Grout is that clingy friend who never leaves. Here’s why grout gets so nasty:

1. Grout is basically a dirt sponge.
It’s porous! This means dirt, oils, moisture, grease, mildew, body wash, hair products, and all the tiny life choices you regret get trapped inside. Additionally, many times as we clean the smooth surface of the tile we push the dirt and grime into the ‘valley’ of the grout.
2. Bathrooms are a mold paradise.
Humidity + poor ventilation = mold and mildew in your shower grout.
3. Kitchens are grease magnets.
Between cooking oils, food splatters and everyday traffic, kitchen grout quietly suffers until it looks like it hasn’t been cleaned since the early 2000s.
4. People think “tile stays clean.”
Nope. Tile hides dirt suspiciously well, and grout tells the truth… loudly.
5. Most people clean grout wrong.
The wrong cleaning product, the wrong brush, vinegar on the wrong tile, or only spot-cleaning instead of deep cleaning. You’re not alone. Everyone struggles with keeping grout cleaning from busy families, renters, Airbnb hosts, and even people who hate cleaning with a passion. That’s why I’m giving you the method that works for ALL of the above.
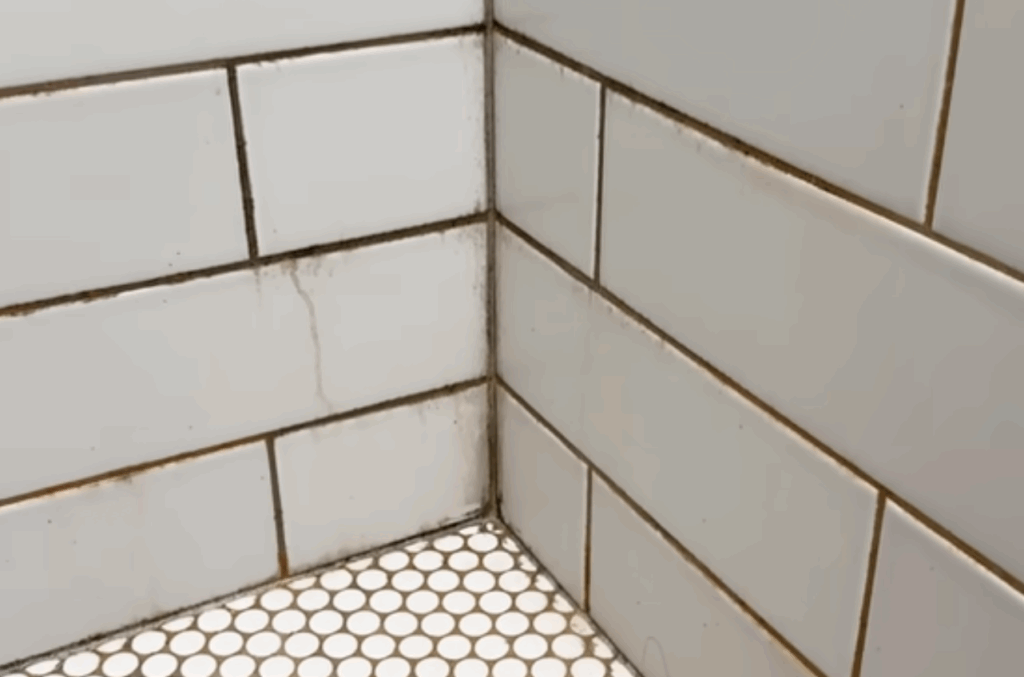
Real-Life Situation #1: The Bathroom Mold That Tried to Win
Let’s start with a classic. A client called me because her bathroom grout had turned black. Not gray. Not dark gray. Black. She told me, “I clean it every week!” After inspecting, I quickly discovered the problem:
The mold wasn’t just chilling on the surface. It was inside the grout lines. Three tools saved this bathroom:
I was able to lift years of embedded mold in under an hour, and the grout went from black to bright white right before her eyes. Let’s just say… she cried. And honestly, I almost did too.
Real-Life Situation #2: The Kitchen Grease Grout Apocalypse
Then there was the kitchen of Doom. Imagine sticky grease residue coating the backsplash tile, the kind you can feel from across the room. Add in years of cooking oils, guests who apparently didn’t know what cleaning wipes were, and grout that had turned orange, brown, and gray… simultaneously. A lesser mortal would’ve walked away.
Me? I grabbed:
Forty minutes later, the tile was shining like a commercial kitchen post-inspection. The customer was shocked. I was reminded why I love cleaning transformations!
My 20+ Year Expert System
The Best Overall Method to Clean Tile & Grout
This is the exact method I use in homes, rentals, tutorials, and all those “how did this get so bad?” situations. If you follow this, your grout will be 10x cleaner and happier!
Bathroom vs Kitchen Tile Cleaning
Tile surfaces need different types of love depending on where they are.
Bathroom Tile
(Showers, Floors, Walls)
Bathrooms = moisture, soap scum, body oils, shampoos, conditioners, shaving creams, and mildew.
Best products:
Avoid vinegar on natural stone like marble. Trust me! It’ll etch.
Kitchen Tile
Kitchens = grease, food splatter, oily residue, general stickiness (technical term)
Best products:
Your kitchen tile will go from “I cook here but I don’t want to talk about it” to “Wow, did I just renovate?”
STEP 1: Start With the Right Tools
I have to say it: Toothbrushes are useful in some grout scenarios, but…If you want clean grout without wanting to throw your back out, you need:
With these tools, you’re already ahead of 90% of people who are still spraying generic grocery-store cleaner and hoping for miracles.
STEP 2: Pre-Treat the Grout (Let the Cleaner Do the Hard Work)
Whether you’re in the bathroom or kitchen make sure of the folllowing. 1) Apply Grout Master (bathrooms) or Green Dragon (kitchens). One note of caution: The label is the Law! Follow the directions and the recommended mix ratios! Also, test the product on a small inconspicuous area before cleaning. 2) Let it sit for 5–10 minutes and lastly 3) Do not rush this part. Let the product penetrate those pores. If your grout is extra gross, let it sit slightly longer. Do not let it dry completely. This pre-treatment alone will loosen a shocking amount of hidden dirt.
STEP 3: Scrub with a Drill Brush (Your New Best Friend)
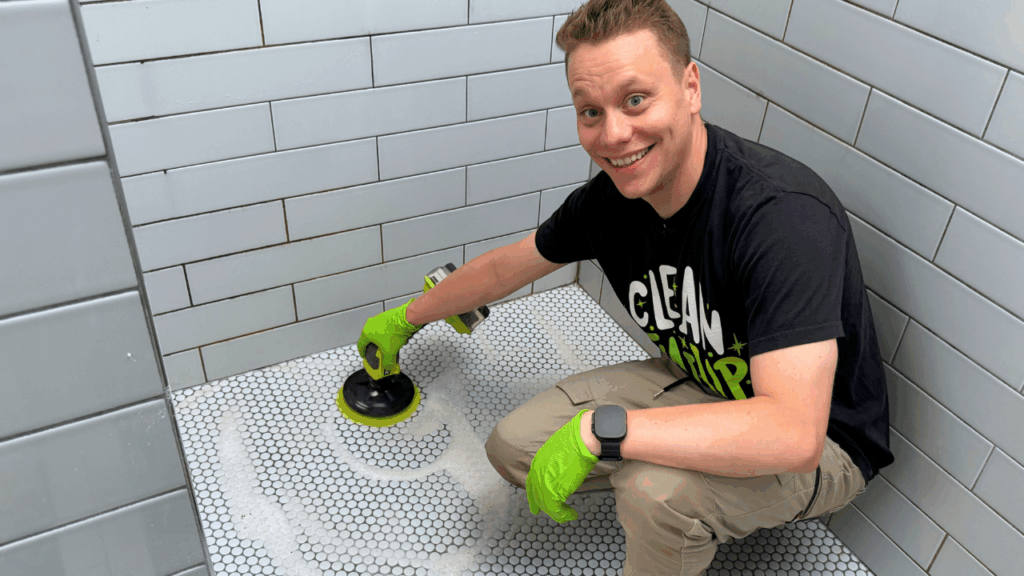
Attach your drill brush and get ready to witness the transformation.
You’ll see dirty water start to form, this is good. This is decades of regret leaving your grout.
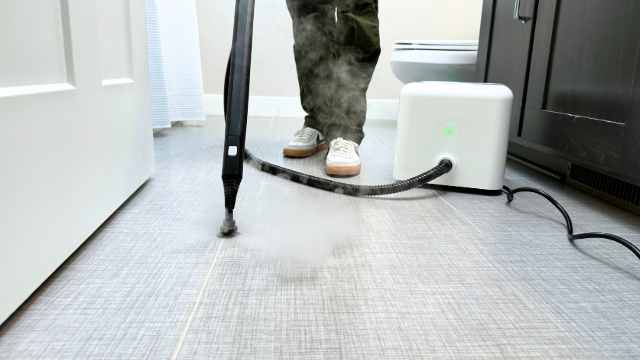
STEP 4: Steam Away What’s Left
Steam is your grout-cleaning superpower. It opens pores, blasts away residue, and kills mold spores, bacteria, and that mysterious orange shower gunk no one can identify.
Tips for steaming effectively:
When the steam hits the cleaner it starts to lift the dirt and grime.. It’s honestly super satisfying!
STEP 5: Rinse Thoroughly
You’d be surprised how many people forget this step. Rinsing ensures no cleaner is left behind to attract more dirt. Make sure to use the following tools:
Wipe everything down until the water runs clear. Keep your microfiber towels looking fresh and lasting longer by caring for them the right way, read this blog article to find more help!
STEP 6: Dry the Tile & Grout
Moisture is enemy #1! Especially in your bathroom. Use a towel or fan to fully dry the area. This prevents mold from coming back and helps you see your results clearly.
STEP 7: Seal the Grout (The Step Everyone Skips… and Regrets)
Listen closely: If your grout is not sealed, it will get dirty again FAST. A sealer protects your grout and tiles by:
Seal your grout every 6–12 months, depending on bathroom or kitchen use.
Long-Term Tile & Grout Prevention (Because You Deserve a Break)
Cleaning grout doesn’t have to be a weekly horror movie. These simple habits prevent disaster-level messes.
Grout Myths People Need to Stop Believing (Immediately)
Why My Method Works – The Expert Breakdown
You’re using a combination of:
Each step supports the next. This is why the result is much better instead of a quick tidy-up.
Take Back Your Grout, Take Back Your Peace
Let’s be real: tile and grout don’t clean themselves. If they did, I’d be out of a job and living somewhere tropical right now. But once you clean grout properly, with the right products, right tools, and right method, everything changes:
And honestly? Clean grout just hits different. You’ve got this. And don’t forget to check our recommended products here on Amazon. Now go unleash your inner cleaning warrior and show that grout who’s boss!